The Yaj Computers Portal

Post Top Ad

Post Top Ad

Wednesday, October 26, 2016

8:59 PM

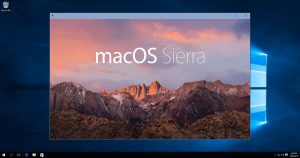
Run macOS on your PC as a virtual machine

Virtual macOS 10.12 Sierra in Windows 10In the olden days, the only way to run OS X (now called macOS) on a non-Apple puter was to hack it. In those days, this was a big no-no.
Fast-forward to today, and things have changed.
Well, sort of.
It still may not be entirely legal to run macOS on your PC, but suddenly it’s very easy to set up. It’s also interesting that despite the very public guides on how to do this, Apple doesn’t seem to care.
So, how do you run a virtual Mac on your Windows or Linux PC?
Easy! You use VirtualBox or VMware. Personally, I switched back to VirtualBox since I seem to have fewer problems with that one, although I was a VMware fan for a short while.
If you’re not familiar with virtualization, here’s a crash course.

What is virtualization?

You have 2 basic options if you want to run more than 1 OS on your puter:
Dual-boot or multi-boot:
You set aside a chunk of hard drive space for each OS, and usually you will use GRUB2 to boot into either Windows, or Linux, or whatever. This is relatively complex to set up for newbies, and if things go wrong you will be crying…
Virtual Machines:
This is where you run a program like VirtualBox or VMware in your host OS. So, if you run Windows 7, you just download and install the free VirtualBox for Windows program. When you run it, it allows you to set aside a chunk of your hard drive as a virtual disk. You then use installation media (like a DVD or image file) for your second OS and “virtually install” the guest OS inside Windows – so to speak.
The idea here is that with VirtualBox or VMware, you can run Windows (for example) normally. Inside Windows, you simply run VirtualBox/VMware, and then start your Linux or macOS. You can think of it as running Linux or macOS contained in a window inside Windows itself. If anything goes wrong, you just delete the virtual machine and start over! No dual-boot, no screwing up of Windows, and it’s fairly fast.
With a virtual machine, you can run an entire operating system (including programs on that OS) in the same way that you’d run Chrome or MS Word. Simple! The whole guest OS and all its programs run inside your host OS. Thus, you can run any OS whenever you want, and all you need is a bit of hard drive space. If you need more speedy storage space, check out Samsung’s 850 EVO SSDs!
Best of all, it’s all free.

How do I install macOS as a virtual puter?

Piece of cake. You just head on over to YouTube and check out Tech Review’s channel. The latest video shows how to install macOS 10.12 Sierra in VirtualBox:

Or in VMware:

Note that you’ll want to click over to YouTube since you’ll need to download the images/files required. The OS images are about 5GB. The links to these files are in the descriptions of the videos.

But, but… Is it legal?

Not really, but yes.
For Windows, you’ll need a product key to run even a virtual copy. Linux is generally free to use as you see fit. For macOS, we enter a bit of a grey area…
You can read the macOS license here. It’s pretty clear that you’re only supposed to install macOS on Apple devices.sierra_icon2x
However, all that’s required to get the macOS image is a Mac – and the Apple Store. Anybody can download it, and there are several publicly-available tools out there for making a bootable USB stick or image that will work anywhere.
Furthermore, if sites like MacWorld are telling you how to install macOS directly on a PC, and Apple doesn’t sue their pants off, then you’re probably safe using a virtual copy… unless you’re afraid that the ghost of Steve Jobs and his army of zombie lawyers are gonna come after you!
And let’s face it: With an estimated 8.5% market share in the OS wars, Apple is playing second fiddle to Windows. It can only benefit Apple to NOT go after people who do this, because maybe they’ll decide it’s worth getting a Mac when they’ve had enough of Windows 10. 😉
And for people like me, it’s very handy to have real macOS running real Safari to test web sites and such!
6:49 PM

Fix Slow Windows Networking Problems When VirtualBox is Installed

If you’ve ever installed multiple operating systems on your computer, you know what a severe pain it can be when something goes wrong. Even removing one of your multiple OSes can be a hassle when bootloaders get all screwed up.
For me, the answer to these problems  is VirtualBox. VirtualBox is a simple, cross-platform virtualization solution that lets you set aside a chunk of hard disk space, give it a name, and then you just tell it, “I want to install linux here”, pop in your install disc (or whatever), and VirtualBox takes care of the rest. Voila, linux running in a window – inside Windows itself. It’s really handy!
Only one problem: Sometimes when VirtualBox is installed (but not even running), your Windows networking may get REEEEALLY slow. You may not even be able to see other machines on your local network.
Fortunately, there is a very quick and easy way to fix it!
Without further ado:
  1. Open the Network and Sharing Center
  2. Click Change adapter settings on the left.
  3. You’ll see your Local Area Connection or WiFi connection listed, along with another adapter called VirtualBox Host-Only Network. Right click this VirtualBox adapter, and choose Disable
You’re done.
It turns out that on every computer I’ve installed VirtualBox on, the “virtual ethernet adapter” is NOT required for VirtualBox to establish network connectivity in my virtual OS installs.
Disabling VirtualBox’s virtual adapter has no effect whatsoever… except that networking in my Windows 7 host OS starts working normally again.
I spent about a week trying to figure out what was wrong with my LAN settings. Hopefully now you won’t have to!
Note that VirtualBox is totally free, and it’s available for Windows, OS X, Linux, and Solaris. Best of all, the performance of a virtual OS install is almost as fast as a native install. It really is zippy! So, give it a try. Don’t worry, there is an online VirtualBox user manual. It’s a piece of cake to set up.
Oh, and Happy Hallowen!
6:47 PM

Fix Windows Media Player music sharing in Windows 10

Windows 10 Media Player Sharing FixSo you get Windows 10. You share your media libraries so other users on your network can see and play your music from Windows Media Player on their own puters.
Unfortunately, when they try to browse your music, WMP connects but quickly declares that your media library is empty!
You double-check the sharing settings, blah blah blah…
Nothing!
What’s going on?

You’re gonna love this…
At least in the November update for Windows 10 (version 1511), you need to either create a new HomeGroup or join an existing one on your local network.
I know, I know, you’re not using a HomeGroup! You’ve got a multi-OS local environment, so you’re just using regular old “Samba” sharing.
Still, if you enable the HomeGroup nonsense, your media sharing will start working normally again.
Note that you (in Windows 10) will not have a problem playing other puters’ media via Windows Media Player. But they won’t be able see or play yours, whether they’re running Windows 7, Windows 8, or Windows 10.
Here are the simple steps you need to follow:
  1. Click Start
  2. Type: homegroup
  3. In the search results, click: HomeGroup
  4. If it says, “You’ve been invited to join a HomeGroup”, then click the Join now button. You’ll need to get the password from whoever set up the HomeGroup on your network. Otherwise, follow the prompts to create a new HomeGroup, and set a password yourself.
  5. You’re done.
Now try accessing your media library from another puter on your local network. You should be able to see your music and other files from someone else’s Windows Media Player.
Don’t ask me what’s going on here, but it works!
6:46 PM

Where is the Startup folder in Windows 10?

Where is the Windows 10 Startup Folder?The Startup folder contains shortcuts to programs that run when you start up Windows.
Back in the olden days of Windows 7, you could easily find the Startup folder. All you had to do was click Start, and type “Startup”.
Wasn’t that easy?
Enter Windows 8, and now Windows 10…
Try the same trick to locate the Startup folder, and you get… nothing!
SIGH.
So, where did the Startup folder go??

You’re going to love this – really.
To find the Startup folder, the quickest way is to do the following:
  1. Hold down the Windows key, and type R
  2. Type: shell:startup
  3. Click OK
shell:startup
That will show you the following folder, which is the Startup folder where some of your startup programs are launched automagically:
User's Startup Folder
This folder is where you add or remove shortcuts to programs to make them run (or not run) at startup.
Note the path to the Startup folder. Kind of a pain to remember, right?
There are two easy ways to “bookmark” this folder.
The first is to use the Pin to Quick Access button:
Pin to Quick Access
Ta-DA!
Now you have a Quick Access link to the Startup folder.
If you’d rather have a link on the Start Menu, first you need to go up one folder level. You can do this either by clicking on “Programs” in the address bar, or by clicking the up arrow to the left of the address bar.
Then, right-click the Startup folder, and choose Pin to Start:
Pin to Start
This will give you a lovely tile on your Start Menu, like so:
Startup Tile
That was easy.
Note also that there is actually a second Startup folder. The Startup folder above is for your user account only.
The second Startup folder is for programs that run at startup for all users on the puter. To find that Startup folder, we have to modify our Win-R trick slightly:
Startup For All Users
This will display the “All Users” Startup folder, which is in a totally different location.
Startup Folder for All Users
The same Quick Access and Start Menu tricks mentioned above apply to the All Users Startup folder.
That’s all there is to it.
If the program you’re seeing at startup isn’t in either of the Startup folders, try uninstalling the program itself. Many programs run when Windows starts, but they are launched via other more complicated methods.
In any case, now you know the Top Secret shell commands to make the Startup folders appear.
Just don’t ask me why Microsoft thought it was a good idea to make them so hard to find!
6:45 PM

Network icon disappeared: Fix missing and “disconnected” network icons in Windows

Eek! No Internets!
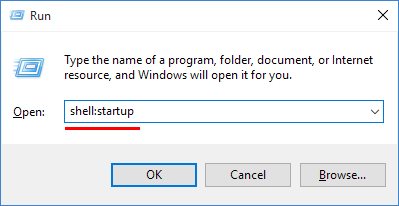
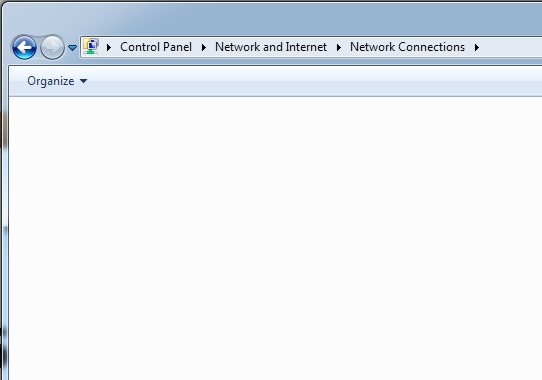
One of the most common problems I’ve seen is missing or “disappeared” network icons in Windows 7.
This problem can take a few different forms.
For example, you may be able to connect to the internet just fine, but your ethernet/WiFi icon in the system tray always claims you are disconnected.
Or, you open up the Network and Sharing Center, click the “Change adapter settings” link, and no network adapters show up – it’s just blank.
But in both cases, everything still works!
There is one fix I have found that actually works, time and time again…

To start with, let’s go over the symptoms real quick just for clarity’s sake. The first problem is the Constantly Disconnected Network icon in the system tray. In short, you see this all the time:

Okay, so this one is lots of fun! No matter what you do, it always shows you are disconnected… but everything works!
The second problem looks like this:
Network Adapters is blank?
In this case, you go to Network and Sharing Center and then click Change adapter settings which opens the Network Connections dialog.
Instead of seeing your ethernet or WiFi adapters, you see nothing. This makes it kind of hard to change any settings…
In many cases, both problems will occur at the same time.
So, how to fix it? Piece of cake!
  1. Click Start
  2. Type: regedt32
  3. Press enter
  4. Using the left pane, navigate to:
    HKEY_LOCAL_MACHINE\SYSTEM\CurrentControlSet\Control\Network
  5. Once in the above folder, right-click on Config and choose Delete
  6. Close Registry Editor
  7. Reboot!!
A view of the key you need to delete in Registry Editor:
Delete the Config key!
Note that if you just open the Network Connections screen again, or look at your system tray icon, it will appear that things still aren’t working. Most of the time, you must reboot for the changes to take effect.
Once you do, your system tray network icon will be fine again, and your Network Connections will once again look something like this:
Oh look! They're back.
Oh look! They’re back.
And that’s it.
I will note that many people recommend completely uninstalling and re-installing your ethernet and Wifi drivers… You can try, but that has never worked for me on any computer that had this problem.
But, the above fix works like a charm!
6:43 PM

Fix Language Bar missing after Windows 10 update

Missing Language Bar
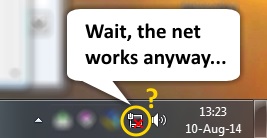
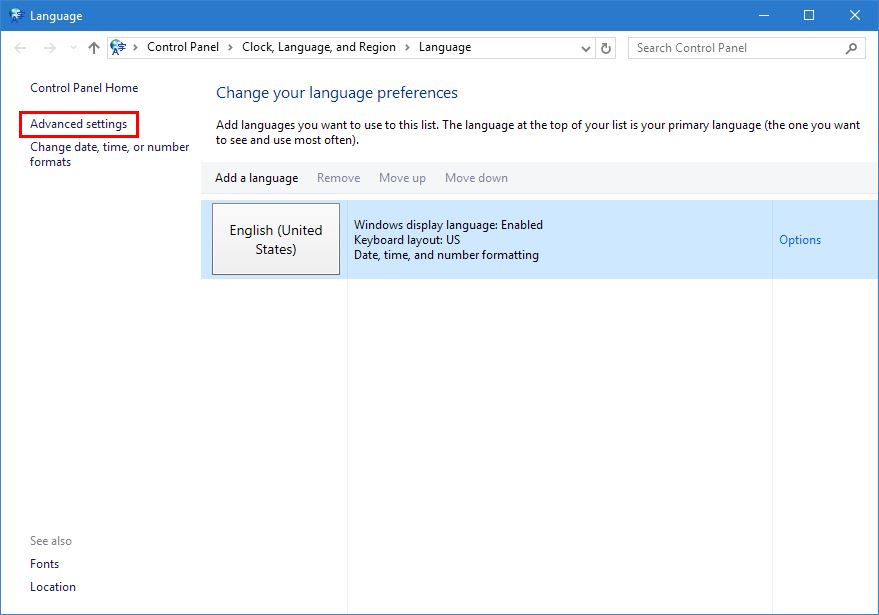
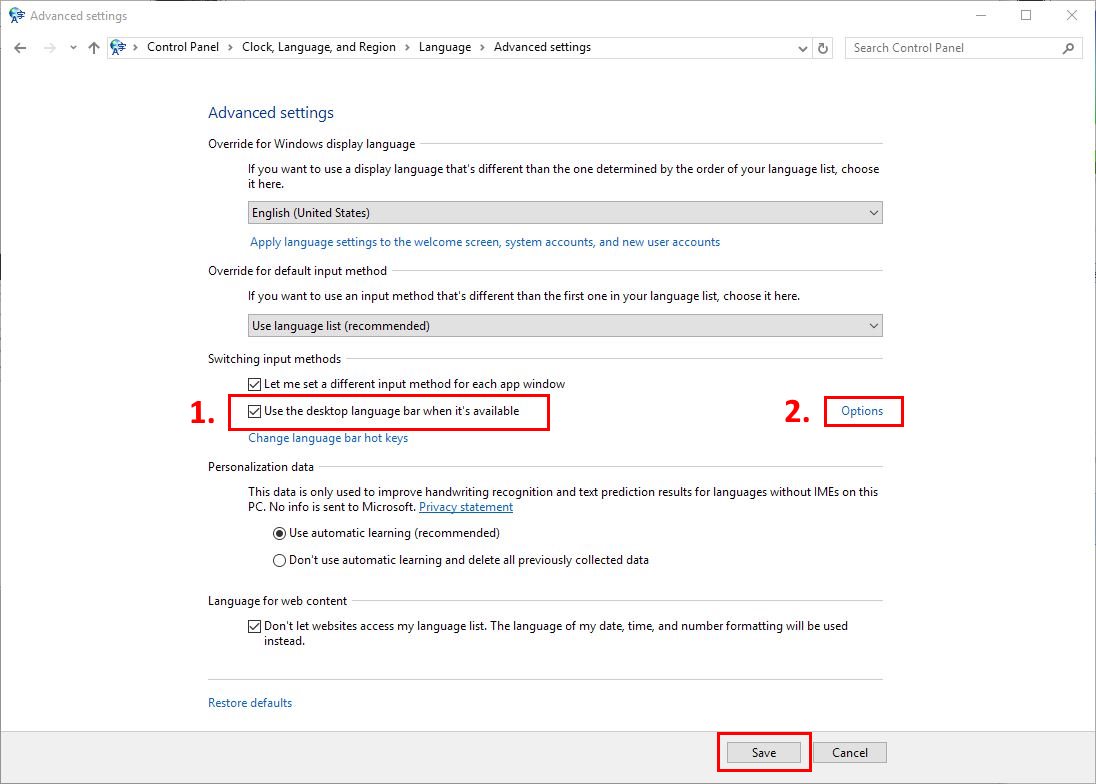
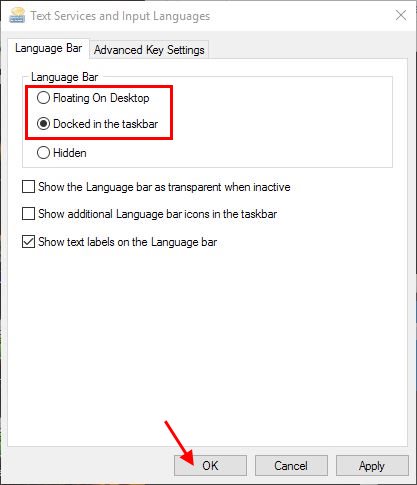
If you speak more than one language, then you probably also write in more than one language.
In that case, you’re probably using Windows’ Language Bar.
In Windows 10, it appears in the system tray (lower-right corner of the taskbar by the time and date) as a 3-letter abbreviation, such as: ENG
There is a common problem that’s been around for awhile, and it’s back with a vengeance in Windows 10: Windows automatically applies some updates, and after your puter reboots, POOF!
No more Language Bar!
How do you get your Language Bar back? Read on!

Now, the actual solution for this problem involves a bit of Registry hacking. So, before we go there, let’s make sure your Language Bar settings haven’t been screwed up.

Check your Language Bar settings

First, click Start and type: language
Then click on: Language (Control Panel)
Language Bar 1
On the Control Panel window that pops up, click Advanced settings:
Language Bar 2
On the next screen, you’ll need to do 2 things.
First, make sure that Use the desktop language bar when it’s available is CHECKED.
Language Bar 3
Second, click the Options link on the right:
Language Bar 4
Make sure that either Floating on Desktop or Docked in the taskbar is selected. Click OK, and then click Save back in the Advanced settings window.
If you still don’t see the Language Bar, carry on!

Hack your registry to restore the Language Bar

Don’t worry, this really isn’t that difficult or dangerous!
First, click Start and type: regedit
Click the regedit search result to run the Registry Editor.
In the left pane, you need to navigate to:
HKEY_LOCAL_MACHINE \ SOFTWARE \ Microsoft \ Windows \ CurrentVersion \ Run
So far, so good!
In the right-hand pane, Right-click in the empty white space somewhere and choose New -> String Value:
Language Bar 5
You should have a new value appear called: New Value #1
Right-click this new value, and choose Modify…
Language Bar 6
In the little box that pops up, paste in the following text for the Value data field:
1
"ctfmon"="CTFMON.EXE"
Language Bar 7
Click OK, close the Registry Editor, and reboot!
Your Language Bar should re-appear now in the system tray.
6:42 PM

Windows 7 File Sharing: Fixing the “Entire User Directory Shared” Problem

File Sharing
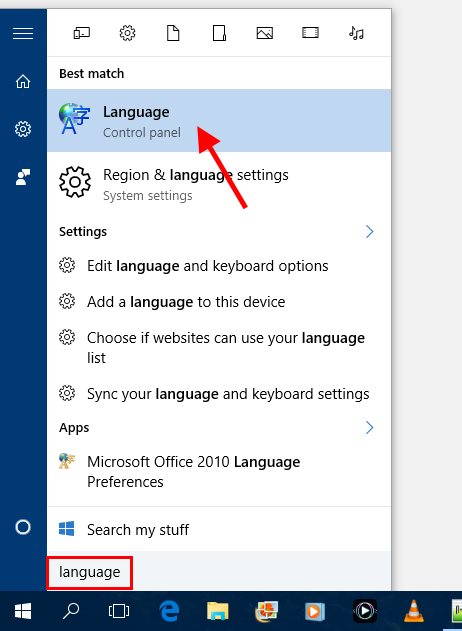
There are many things to love about Windows 7. It truly is “Vista done right”, sad as that may be. But it ain’t perfect.
One of the most common problems, as I recently discovered, is that you tell Win 7 to share only your Public directories, but it doesn’t quite listen. Due to some apparent bug that is at least present in the Release Candidate build of Win 7, sometimes the OS will share your entire Users directory, which includes your Public files/folders. That means ALL your files are shown to the whole world on your LAN – not just the your public folders.
Fortunately, it’s pretty easy to fix this little problem once you know a few little bits of information…

I know, I know – you shouldn’t have to dig into the guts of file sharing and permissions. It should “just work”. Well, don’t feel bad. Try sharing some directories with the whole world on a Mac or Linux box without a password, and you will quickly find yourself delving into the horrors of Samba config files. At least Win 7 doesn’t make you do that sort of frustrating crapola. Count your blessings.
Anyhow, here’s how Windows 7 shares stuff: There is a Users directory, typically C:\Users. Under this Users directory is the directory for your user account, which we’ll say is C:\Users\Scottie. Then there is also another subfolder for publicly-shared directories: C:\Users\Public. Pretty easy, right?
Normally, yes. But sometimes, when you use the Win 7 GUI – the “Network and Sharing Center” – your C:\Users\Public folder is shared, AND your entire C:\Users\Scottie folder (“Scottie” will be different in your case) will also be shared, much to your dismay. Nevertheless, Windows will still tell you via the GUI that only your Public folders are shared. Oops.
You might think that you can simply right-click the Users folder, look at the Sharing tab, and just sort things out quickly and easily. Unfortunately, it isn’t quite so simple. In Windows 7, file sharing depends on two things: the file sharing settings, and the folder’s permissions.
So, if you want to keep your Public shared, but hide the files under your personal Users directory, here’s how to do it…
Step 1 is to hide the entire C:\Users directory:
  1. Open Explorer and right-click on the C:\Users folder and select Properties.
  2. Click the Sharing tab, and then click the Advanced Sharing button (NOT the “Share…” button!!)
  3. Click the Permissions button, select “Everyone”, and then clear the checkboxes for “Full Control”, “Change”, and “Read”.
  4. Click OK, and then clear the “Share this folder” check box in the Advanced Sharing window.
  5. Click OK, and then close the Properties window
At this point, you will have successfully unshared the entire Users directory, including the Public dir and all its subdirectories. You can verify this by connecting to your computer from another machine on the LAN.
Okeydokey. Now, if you want to make your Public dir show up again, just do the following:
  1. Open Explorer and go to C:\Users.
  2. Right-click on the Public folder and select Properties.
  3. Click the Sharing tab, and then click the Advanced Sharing button (again, NOT the “Share…” button!)
  4. Click “Share this folder” and give it a Share Name of “Public”
  5. Click the Permissions button, select “Everyone”, and then make sure to check the boxes for “Full Control”, “Change”, and “Read”. If you only want people to be able to read the files in your Public dirs, just check “Read”.
  6. Click OK, OK, and the close the Properties window.
You’re done! Note that when you share/unshare folders, you’ll probably have to wait a moment or two while the permissions on all the files and folders are changed. In any case, you can now go once again to another computer on your local network and verify that only your Public folder is shared.
This little trick is also useful if you’d like to set up file sharing the way it worked in Vista. In Vista, when only your public was shared, it would show up on the network as: \\Scottie\Public
In Windows 7, Microsoft for some reason decided it would be more fun to confuse everyone by changing the network path to: \\Scottie\Users\Public
Because, ya know, confusing changes like that always help everyone!
But, no worries – you can now make 7 work like Vista, and anyone on your LAN with your drives mapped will actually see your files again instead of an error when you upgrade from Vista to 7.

Have fun!
6:40 PM

Pin folders to the taskbar in Windows

Pin a folder in Windows 7This is one of those Windows tricks that you probably didn’t even know existed.
Usually, the Explorer icon is visible on the Taskbar.
That’s great for opening Explorer and navigating to whatever folder you need.
But what if you want to maintain a list of commonly-used folders without clogging up your desktop with a bunch of shortcuts?
It turns out there’s a quick and easy solution for this very problem.

Now, you should have Explorer on your taskbar, like so:
Explorer in the Windows Taskbar
If you don’t have it there, adding the Explorer icon to the taskbar is pretty easy: Just drag any folder onto the taskbar.
POOF! You’ve got Explorer on your taskbar now.
One little problem: No matter what folder you drag onto the taskbar, Windows will always turn it into a shortcut to Explorer itself – not to the folder you dragged onto the taskbar.
So, here’s the trick.
Once you’ve got Explorer on the taskbar, drag any other folder you’d like to have a link to onto the taskbar. Before you let go of the mouse button, you’ll notice a little “tooltip” appears that says: Pin to Explorer
Let go, and up will pop the Explorer Jumplist. You’ll notice that your new folder is listed at the top of the jumplist as “Pinned”.
Now, if you want to open Explorer, click the Explorer icon as usual.
But, if you want to open one of your pinned folders, right-click the Explorer icon on the taskbar, et voila!
Your pinned folders appear, like so:
Pinned Folder
Okay, but what if you want to remove a pinned folder? Piece of cake.
Right-click Explorer on the taskbar, and then hover your mouse over the Pinned folder you’d like to remove. You’ll see a pushpin, and if you click it, it will “unpin”  the folder from the Explorer jumplist.
Unpin folder from Jumplist
You can pin a bunch of folders to Explorer on the taskbar, free up desktop space, and your favorite folders will always be 2 simple clicks away.
When you think about it, this is pretty nice. If the folders were on your desktop, you’d have to double-click to open them anyway. Double-clicking is obviously quicker than right-click + normal click, but still… Fewer shortcuts on the desktop is never a bad thing!
Finally, now that you know about Jumplists, try right-clicking the other programs on your taskbar. Most programs have all kinds of handy things in their jumplists.
For example, try right-clicking your Firefox or Chrome icon on the taskbar. BOOYAH! Quick access, and less clicking…

Enjoy!
6:38 PM

Move Your Docs, Music, Pics, & Vids to a Different Drive or Folder in Windows

Let’s say you’ve got Windows 7, and you install a second hard drive. Perhaps you have an SSD as your primary drive, and you want to store your GB’s of MP3s, videos, and documents on your second data drive.
Well, you could just copy the data into a new folder the old fashioned way. Doing this tends to break Windows 7’s “libraries” feature, and suddenly you have to tell Windows where to find all your files. That’s kind of annoying.
Fortunately, there is a built-in feature for moving your My Documents, My Music, My Videos, My Pictures, and even your Downloads folder automagically – and Windows will still keep track of everything for you!
Here’s how you do it:
  1. Open Explorer (Win-E if you like keyboard shortcuts)
  2. Find your way to C:\Users\[YOUR ACCOUNT NAME]
  3. Right click on the folder you want to move (such as “My Music”) and choose Properties
  4. Select the Location tab
  5. Click the Move button
  6. Select a new location for your goodies. You can put the folder anywhere, and even create new folders and subfolders on any drive to store your loot
  7. Click Yes when prompted about whether or not you want to actually move all the files over to the new location
That’s it! You can repeat the process for the rest of your “My” folders. Windows apps like Media Player will still know where to find your music and other files.
So, that’s great. But what if, say, you have a custom folder with a bunch of huge files on your C:, and you want to move those to your secondary drive as well?
Maybe you have a folder C:\Junk, and you’ve stored a bunch of files that some of your applications now expect to live in C:\Junk – but you’d rather have them off your boot drive and store them instead on your secondary drive. If you just move the folder to your second hard drive, all those apps will complain.
Enter mklink.
mklink is a seriously handy command line utility in Windows 7 and Vista that let’s you make your own fancy “virtual folders”, otherwise known as “symbolic links” and “hard links”  in Linux Land.
To move a folder C:\Junk onto E:\Junk and have your apps still believe that the actual contents in Junk still reside at C:\Junk, do this:
  1. Move your Junk folder onto E: the old fashioned way
  2. Click Start and type cmd (but don’t press enter)
  3. Right click on cmd.exe in the Start Menu and choose Run as administrator
  4. In the command prompt window, type: mklink /h /j c:\Junk e:\Junk
(For details of what the command is doing, just type help mklink in a command prompt window.)
Voila! Now you have a C:\Junk and an E:\Junk. The only difference is that your files actually live in E:\Junk, but C:\Junk is hardlinked to E:\Junk. So, if an application tries to access C:\Junk, it is fooled into reading the contents of E:\Junk, even though it still calls the directory “C:\Junk”.

Handy, yes?
6:36 PM

Repair missing User folders in Windows

At some point, you’ll probably run into a problem that doesn’t seem to have an easy solution: one of your default User folders in Windows 7 (My Documents, My Pictures, My Music, My Videos, Downloads, and Desktop) will suddenly disappear.
Try as you might, you won’t be able to restore these user folders, because they are actually “special”. Windows treats them differently than a normal folder you might create yourself, and they even have pretty icons, like so:

There is a lot of info out there on how to fix these built-in Windows 7 folders, but it’s all rather complicated.
So, here’s the boiled-down, anybody-can-do-it version on how to restore your missing User folders – or so I hope!

First, a few bits of info you’ll need to keep in mind. The default locations for the User folders in Windows 7 are:
  • C:\Users\USERNAME\Desktop
  • C:\Users\USERNAME\Documents
  • C:\Users\USERNAME\Downloads
  • C:\Users\USERNAME\Music
  • C:\Users\USERNAME\Pictures
  • C:\Users\USERNAME\Videos
Just replace USERNAME with your Windows account login, which in my case is “Scottie”. So, my Desktop folder is:
  • C:\Users\Scottie\Desktop
These are the actual names of the folders as stored on your hard drive, but since we’re talking about special User folders, they are magically turned into “My ___” folders with the special icon.
So, that’s that. Next, we’re gonna repair your folders. The process will go like this:
  1. Create/rename the User folders
  2. Edit the Registry to reset The Magic
  3. Run some command-prompt stuff to finish The Magic
  4. Reboot
Don’t worry, it’s all very simple!

Create/Rename the User Folders

So, open Explorer (Win-E, or double-click the Computer icon) and navigate to: C:\Users\USERNAME
Here, you’re going to need to decide which folder(s) are screwed up.
Even though the PATH to the User folder doesn’t contain the word “My”, the version you see in Explorer should look like so:
  • Desktop
  • My Documents
  • Downloads
  • My Music
  • My Pictures
  • My Videos
Note that “Desktop” and “Downloads” do NOT have “My” in front of them in Explorer, but they DO have Magic Folder Icons, which look like so:

If a “magic folder” icon is not there, and it just looks like a regular folder icon, you just need to check the folder name and change it if necessary. If a folder is completely missing, you’ll need to create a new one. Again, the following is the list of folders you may need to create/rename:
  • C:\Users\USERNAME\Desktop
  • C:\Users\USERNAME\Documents
  • C:\Users\USERNAME\Downloads
  • C:\Users\USERNAME\Music
  • C:\Users\USERNAME\Pictures
  • C:\Users\USERNAME\Videos
For example,  if you see “My Documents” and it’s a magic icon, you do not need to do anything.
If you see a normal yellow folder called “Documents”, do nothing.
If there is no “My Documents” or “Documents”, then create a new folder C:\Users\USERNAME\Documents.
There are two steps here:
  1. Check for the Magic Folder Icon
  2. Check that non-Magic Folders have the proper name, which prepares us for the next step
Maybe only your Downloads folder is screwed up, and all the other folders are okay (Desktop, My Documents, My Music, My Pictures, My Videos). In that case, make sure there is a folder “Downloads”. If there is, go to the next step. If there isn’t, create it first.

Reset the Registry User Folder Settings

This part might seem scary, but it’s really easy.
  1. Click Start
  2. Type: regedt32
  3. Click the program regedt32.exe to run the Registry Editor
  4. In the left pane, navigate to:
    HKEY_CURRENT_USER\Software\Microsoft\Windows\CurrentVersion\Explorer\User Shell Folders
You should see this:
RegEdit: User Shell Folders
(click to enlarge)
I’ve highlighted the fields you’ll need to look at. You can see that there is one entry for Downloads, one for Desktop, one for My Music, etc. For each folder you need to fix, you’ll want to do 2 things:
  1. Make sure the Name field is correct (far left, in pink)
  2. Make sure the Data field is correct (far right, in pink)
Now, in Windows 7, the path C:\Users\USERNAME\ is often written as %USERPROFILE% internally in Windows. This is just a variable that points to your Users directory. Simple, yes? It’s also quite handy.
So, in the Registry Editor, make sure you’re using the default values, like so (Name –> Data):
  • {374DE290-123F-4565-9164-39C4925E467B}  –>  %USERPROFILE%\Downloads
  • Desktop  –>  %USERPROFILE%\Desktop
  • My Music  –>  %USERPROFILE%\Music
  • My Pictures  –>  %USERPROFILE%\Pictures
  • My Video  –>  %USERPROFILE%\Videos
  • Personal  –>  %USERPROFILE%\Documents
Don’t ask me why the Name for Downloads is that wonky string, or why the Name for Documents is “Personal”… It’s Microsoft.
To correct the Name field, right-click the Name and select “Rename”:
RegEdit: Rename Key
To change the Data field (the folder path), double-click the name field, and enter the new path from the list above:
Registry: Modify Key Data
In my example, I don’t want My Documents pointing to E:\Users\Scottie\Documents, because I don’t have E: any more! Oops.
First, I made C:\Users\Scottie\Documents in the steps above.
Now in the Registry Editor, I would not change the Name of “Personal”, since that’s okay according to the list above. But I would double-click it, and change the Data to %USERPROFILE%\Documents
Do the same for any other User folders you need to fix. When you’re done editing, just close the Registry Editor (it saves automatically).

Last crazy step

Now you’re going to complete The Magic. Do this:
  1. Click Start
  2. Type: cmd
  3. Right-click cmd.exe and choose Run as administrator
  4. For each folder you need to fix or recreate, run the following command(s):
  • Downloads:
    attrib +r -s -h %USERPROFILE%\Downloads /S /D
  • Desktop:
    attrib +r -s -h %USERPROFILE%\Desktop /S /D
  • My Documents:
    attrib +r -s -h %USERPROFILE%\Documents /S /D
  • My Music:
    attrib +r -s -h %USERPROFILE%\Music /S /D
  • My Pictures:
    attrib +r -s -h %USERPROFILE%\Pictures /S /D
  • My Videos:
    attrib +r -s -h %USERPROFILE%\Videos /S /D
Highlight each “attrib” command you need above, and copy it (Ctrl-C, or right-click and pick Copy). Then, in the Command Prompt window, click the C:\ icon in the upper-left corner and choose Edit -> Paste:
Command Prompt paste!
Less typing = good!

Reboot

That’s it. You’ve made sure your missing folder(s) exist, you’ve done some Registry hacking to reset the Magic Folders, and you’ve set the proper attributes on your new folders.
All that’s left is to reboot! When you log back in, you should see your User folders restored to mint, magical condition.

Final Notes

Hopefully, this has been fairly easy to follow. For other User folders (Contacts) or for Windows 8, check out Seven Forums tutorial on this very topic.

I found their explanation rather difficult to follow, but it does have more information – and even some .REG files you can download and run to avoid doing any registry editing yourself. Check it out!

You May Like to Read:

You May Like to Read:

Popular Posts