The Yaj Computers Portal

Post Top Ad

Post Top Ad

Tuesday, March 14, 2017

12:11 AM

Warcraft III Complete Edition

Click image for larger version. 

Name: warcraft-3-complete-edition-pc-cover-www.ovagames.com.jpg 
Views: 3 
Size: 38.2 KB 
ID: 1187041


Title: Warcraft III Complete Edition MULTi6 - ElAmigos
Genre: Strategy
Developer: Blizzard Entertainment
Publisher: Blizzard Entertainment 
Release Date: 15 Mar, 2004
File Size: 3.16 GB / Split 7 parts 500 MB
Mirrors: Google Drive

– System Requirements : MINIMUM:
CPU: Pentium III or Athlon
CPU Speed: 600 MHz- RAM: 256 MB
OS: Windows 98/ME/2000/XP
Video Card: 32 MB 3D Accelerated Video Card with DirectX 8.1 support
DirectX version: 8.1
Warcraft III: Reign of Chaos is a high fantasy real-time strategvideo game released by Blizzard Entertainment in July 2002. It is the second sequel to Warcraft: Orcs & Humans, and it is the third game set in the Warcraft fictional Universe. An expansion pack, The Frozen Throne, was released in July 2003.

Warcraft III contains four playable races:[1] Humans and Orcs, which had previously appeared in Warcraft: Orcs & Humans and Warcraft II: Tides of Darkness, and the Night Elves and Undead, which were introduced to the Warcraft mythos in this installment.[2] Warcraft III? ’s single-player campaign is laid out similarly to that of StarCraft, also by Blizzard Entertainment, being told through all four of the game’s races in a progressive manner. Multiplayer mode allows for play against other players, via the internet, instead of playing against computer-controlled characters as is done in the single-player custom game mode.


Link:
Part 1: https://docs.google.com/uc?id=0BxGtk...xport=download
Part 2: https://docs.google.com/uc?id=0BxGtk...xport=download
Part 3: https://docs.google.com/uc?id=0BxGtk...xport=download
Part 4: https://docs.google.com/uc?id=0BxGtk...xport=download
Part 5: https://docs.google.com/uc?id=0BxGtk...xport=download
Part 6: https://docs.google.com/uc?id=0BxGtk...xport=download
Part 7: https://docs.google.com/uc?id=0BxGtk...xport=download
12:03 AM

notepad and beginning html


In these tutorial series I assume that you are a complete noob or that you have seen my other tutorials! These should be somewhat easy, but if you have a question just ask!

In this tutorial I'll show you where to download Notepad++ and how to use, header, paragraph, link, and image tags.

Put this in your text editor:


As you can notice, the tags are all lowercase; right now it don't matter if you do uppercase or lowercase for in my next tutorial I'll introduce you to

. All the elements that you want the visitor of your website to see will be in the

tags. 
Header tags go from

to
. You may not think these are important, but when we make a WordPress theme they will be . Here is the code I used:

Hello Youtube

Hello Youtube

Hello Youtube


When you display that in your web browser you should notice that the text is bold and the font is huge; you should also notice how the font size decrease as the header number increases. You can now assume that
is the smallest.

defines a paragraph. There is a lot of styling you can do with paragraphs that I will show you when I start the CSS tutorial series. Here is the code I used in the video:
This is an example of a paragraph.

There really isn't much to explain about the paragraph right now.
When we begin creating full fledged websites we will be using links to create magnificent navigation bars. Links may be a little tricky to remember because they don't have one letter or one number for the syntax. Here is the code that I used in the video:
YajComputers

When you deploy that in your web browser you will notice that the font color is blue, it's underlined blue, and that if you click on it you will be at YouTube. Then if you go back to the file the text and underline will probably be purple. This looks rather ugly, but we shall make it look beautiful when we finish CSS.
Images are very similar to the links. I try to use a photo from Newegg, which I fail to do. lol. Here is the code I used in the video for images:


You begin by declaring an image. You then declare the source of the image and give the URL. You then declare the height and width of the image. It's in pixels.

I hope you liked my tutorial. If you have any suggestions or questions leave a comment! 

Saturday, February 4, 2017

6:24 PM

How to reset Canon MP287 Printer Error Code P07

Canon MP287
Canon MP287

I've tried several tutorials online but unfortunately it didn't resolve the problem because of the resetter program which is not compatible to the printer. 

So here's how to do it,

First, Turn off the printer
2. After turning OFF, press and Hold the STOP button at the same time Press and hold the Power button
3. Release the STOP button ( Don't release the Power button )
4. Press the STOP button  6 or 7 times
5. Release the Power button
6.It will display/show black.


Now it will set the printer into service mode. If something will popup to install your printer, just ignore it, and click cancel.

The next thing to do is to download the Service Tool for Canon MP287 printer. Click here

After you have successfully downloaded the program, just  follow the steps shown on the image below.

Reset Canon MP287
In my case after I clicked the set button of Clear Ink Counter : Absorber-main, and restart the printer it solves the error P07 and can now print. Just perform a deep cleaning for 3-5 times to set the printer into a good quality printing.


MORE: RESET EPSON L110 Click Here
                    RESET CANON MP237  Click Here Disclaimer: The program (Service Tool)is not my own. Download it at your own risk. YajCom will not be held responsible for any damages caused  to your device.
6:20 PM

How to change Wifi password and SSID in Globe Tattoo 4G LTE Wifi (HUAWEI Model: B315s-936)


Tattoo - 4G Globe is a wireless modem plus Wi-Fi router that enables a user to share internet access with other Wi-Fi-capable devices simultaneously.

Here's How to change Wifi password and SSID in Globe Tattoo 4G LTE  Wifi (HUAWEI Model: B315s-936)

(Note: Make sure that your computer is connected to your Globe tattoo)

Step 1. Open you internet browser (Mozilla Firefox or Google Chrome) type in 192.168.254.254 this address can be found at the back of your Globe tattoo. Then click Log In at the upper right-side of the screen.

Step 2. Type in the User name and Password in the login dialog box. User name as: user and the password is also written the back of your Globe tatto


Step 3. After you successfully logged in, click Settings at the menu bar, then, WLAN>WLAN Basic Settings. You can change the defaul SSID to you desired wifi name, select the Security mode, and the WPA pre-shared key or Wifi password. Make sure that SSID Broadcast is enabled, then click Save and you're done.

see example below
6:15 PM

How to Reset SmartBro Pocket Wifi


There are lots of queries on how to reset the pocket wifi, since I personally don't see anything like reset button.

So, here a very simply way to reset it, actually it's already been there ever since, you just have to be cautious on your device.

Step 1. Log-in to your SmartBro Pocket Wifi by opening your Internet Browser/Chrome/Safari/Opera/Mozilla FireFox

Type in 192.168.1.1
username: smartbro
password: smartbro

see example below


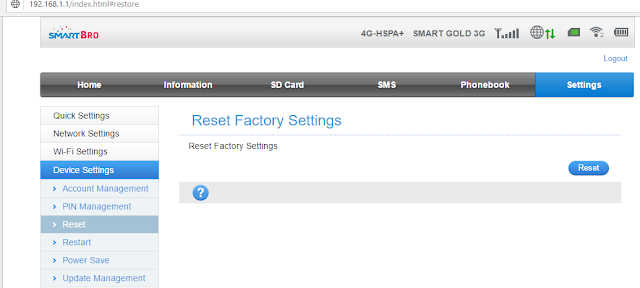
 Step 2.  Click on Settings > Device Settings > Reset and Click Reset Button

See Example Below


Reset Smartbro Pocket Wifi


To reset the pocket wifi if you forgot the password of the router:

PRESS Buttons "ON" and "WPS" at the time for about 5 secs. It should reset it to Factory Settings then you can use the default password (smartbro) to log in to the dashboard and change settings again."
6:13 PM

How to Fix File folders become shortcuts or hidden in Removable media

Do you have Removable media, like Flash drives, SD memory cards, External HDD,  that file folders become shortcuts or hidden? Don't reformat it yet. A virus or Trojan  has infected your media device.
USB Flash Drives

There are two methods on how we can fix this kind of problem. 

Method 1
(Windows XP)
Open My Computer.
  • From the Tools menu, choose Folder Options
  • Click on the View tab in the Folder Options window.
  • In the Advanced settings: text area, locate the Hidden files and folders category.
  • Choose the Show hidden files and folders radio button under the Hidden files a
     nd folders category.
  • Click OK at the bottom of the Folder Options window.


(For Windows 7 and Windows 8) 
Figure 1
Open My Computer.
  • Click Organize see Figure 1
  • Select Folder and search options see Figure 1
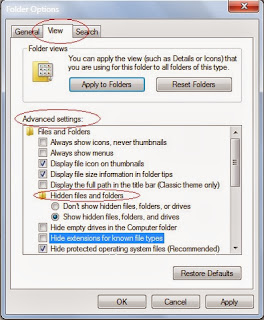
  • Folder Options window will pop-up see Figure 2
  • Click View tab
  • In the Advanced settings: text area, locate the Hidden files and folders category.
  • Choose the Show hidden files and folders radio button under the Hidden files and folders category.
  • Unchecked : Hide empty drives in the computer folder, Hide extensions for known files
  • Click OK at the bottom of the Folder Options window.
Show Hidden Files
Figure 2
Method 2
Open Command Prompt
  • Start > All Programs > Accessories see Figure 3
  • Locate your Removable media or flash drive in My computer and remember what letter is assigned for your flash drive, it is usually G or F
  • in the command prompt type in carefully  Attrib -r -a -s -h /s /d G:\*.*   
  • the hit Enter key 
note: replace G: with the letter of your flash drive.

Figure 3


Figure 4
note: replace G: with the letter of your flash drive.

This will show hidden files in your removable media, but this doesn't kill the virus or Trojan, be sure to scan your Flash drives with the updated AntiVirus like Avast, and Anti Malware software like Malwarebytes

You May Like to Read:

You May Like to Read:

Popular Posts